Rig rate summary
The Rig rate summary (RRR) feature in RigPulse is designed to generate detailed summaries of daily rig activities, broken down by time and associated cost rates. These reports are mainly used for financial reconciliation, performance tracking, and approval by key stakeholders, including DSLs, OIMs, and both offshore and onshore operator representatives.
How it looks
Where to access the Rig rate summary
The first access dashboard is your starting point for working with Rig rate summarys. From here, you can access two key modules—Day rate summaries and Rig rate summarys—and either view existing reports or create new ones.
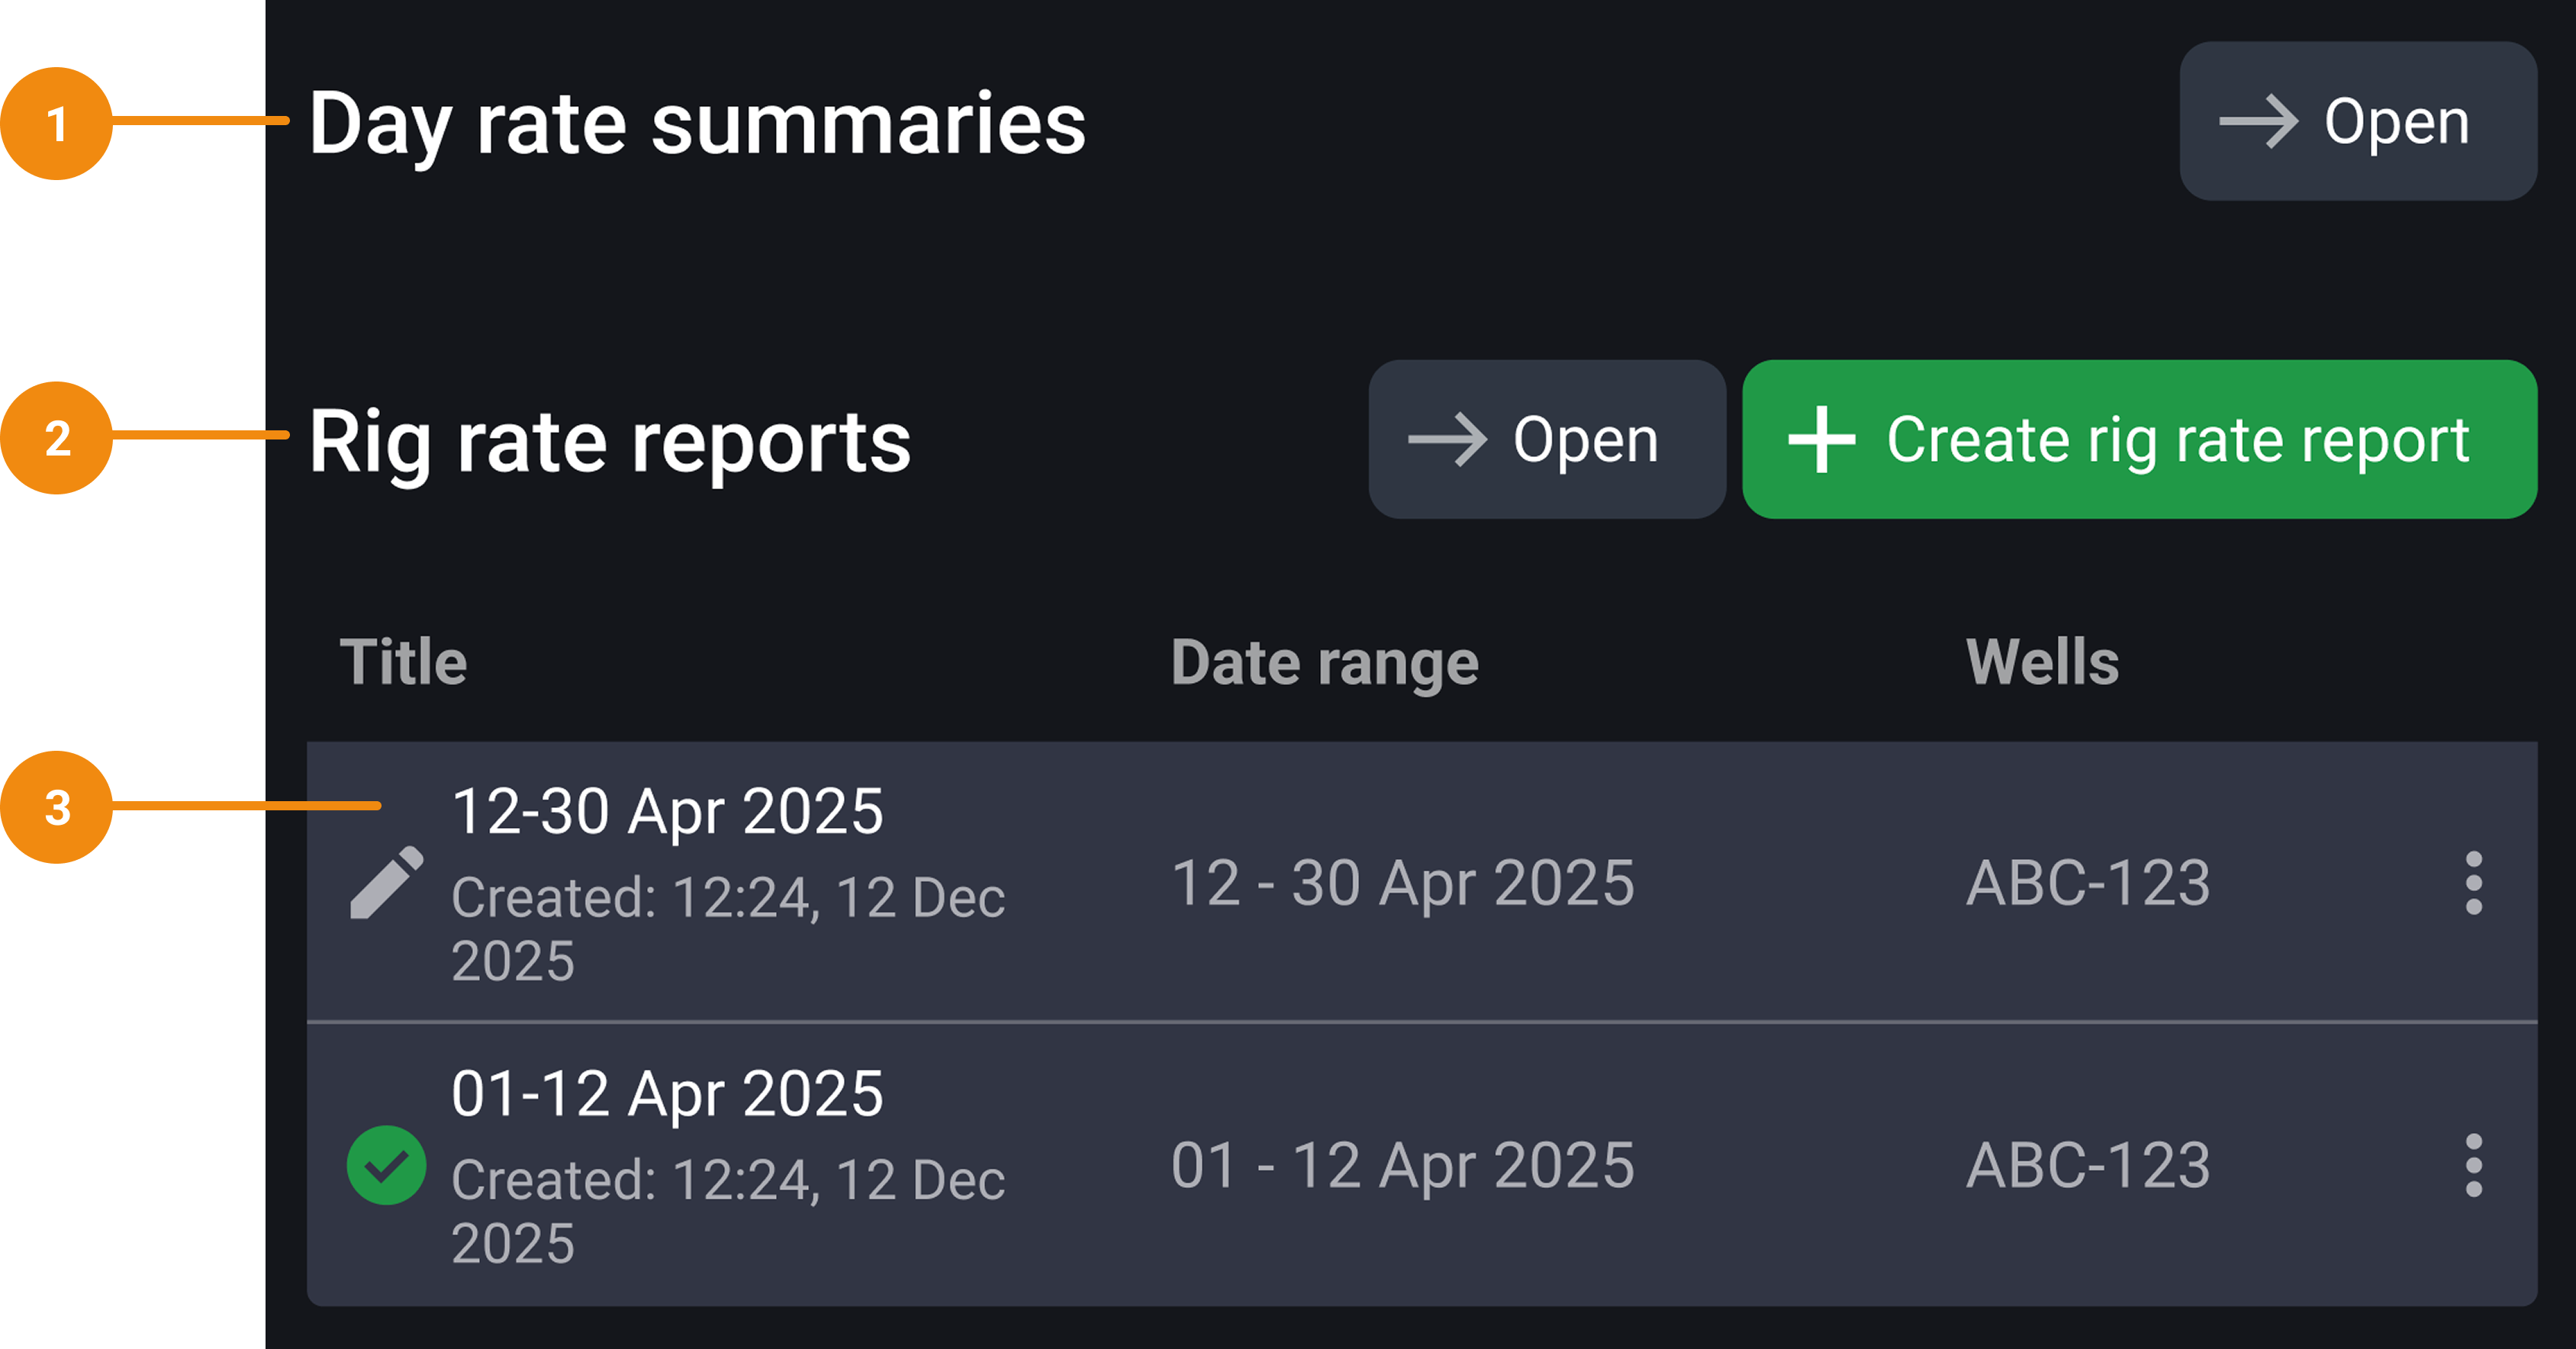
Day rate summaries panel: Shows operation summaries and applied rates, grouped by contract and listed for each day. Its open button takes you into the Day rate summaries module, where you can find the
 Create Rig rate summary button, allowing you to start a report based on the currently selected month’s data.
Rig rate summary panel: Displays a list of existing reports for the selected month. Its open button takes you into the Rig rate summary module, and its
Create Rig rate summary button opens the modal to start a new report.Report list: Shows existing reports for the selected month. If there are any reports, they appear directly in this panel with information on their status, title, date range, and well.
Rig rate summary module
The Rig rate summary module is the main interface where you review, edit, and manage the report after it’s created.
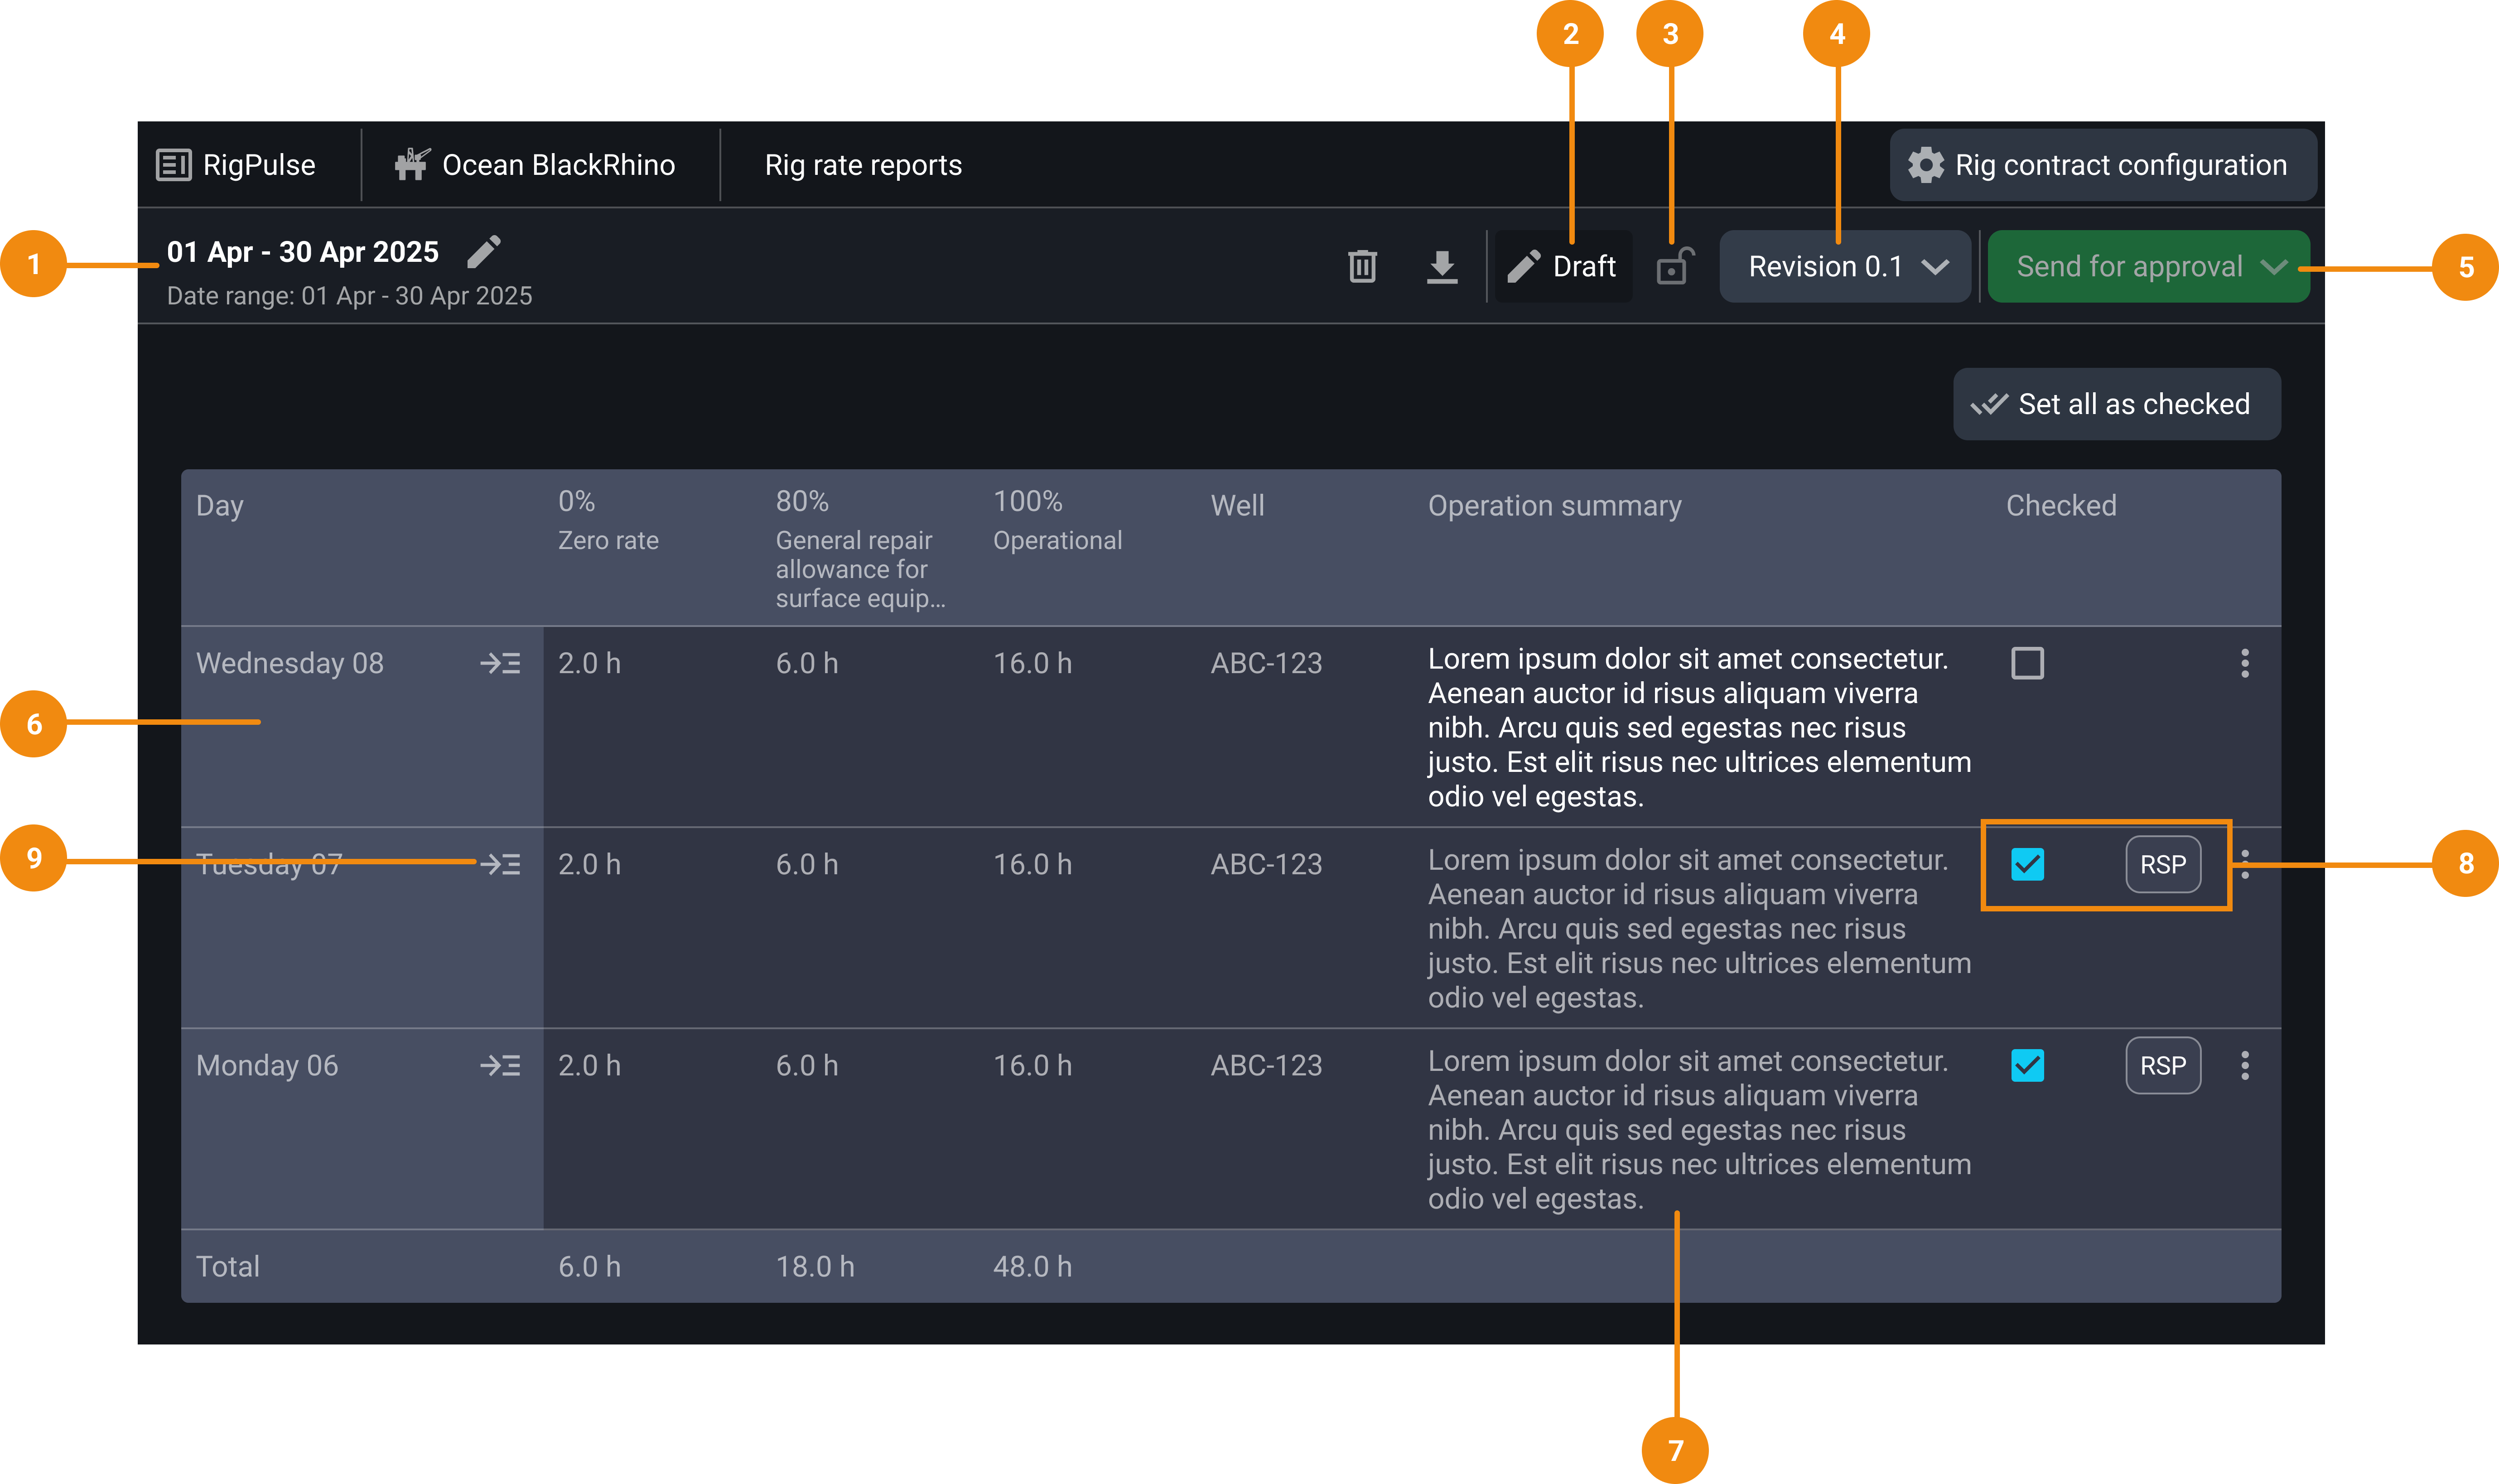
Report title and date range display: This section displays the start and end dates that the report covers and its title. You can click the edit icon beside the title to rename the report.
Lock icon: This icon shows if the report is locked or unlocked. Clicking it gives options to lock, unlock, or cancel unlocking.
Status indicator: Shows whether the report is in Draft, For Approval, or Approved status.
Revision number: Displays the current revision number. Clicking it opens the Revision History, showing previous versions and allowing you to export or compare them.
Send for approval: Starts the approval workflow. Two options are available: sending via RigPulse or downloading a manual approval document.
Daily drilling report (DDR) lines: Each row represents one day in the selected date range. Shows operations, rate codes, and other key data pulled from the DDR.
Operation summary cell: Editable field that lets you add more detail or correct information for each day. This can be updated before checking the day.
Checkbox (Day check): Use this to mark a day as reviewed and lock it. All days must be checked before the report can be sent for approval. A responsible tag appears after a checkbox is selected to show who reviewed it.
Go inside button: Clicking it opens the original DDR entry for that day, letting you see full operational history.
Step-by-step instructions
Accessing Rig rate summary
You can enter the Rig rate summary workflow through two modules on the RigPulse dashboard:
Day rate summaries
Displays daily rate data pulled from Daily drilling reports for each day. Use this view to preview the summarized operations and day rates before creating a report.
Locate the Day rate summaries: Find the rig you want to work with and click on the rig card to access its RigPulse page, and locate the Day rate summaries section.
Click the open button: Open the Day rate summaries by clicking the Open button next to the section title.
Create a Rig rate summary: Navigate to the top of the panel and click the
Create Rig rate summary button to open its modal.
Rig rate summarys
Shows a list of all previously created reports for a selected year. You can browse past reports, filter by year, and create new reports from this view.
Locate the Rig rate summarys: Find the rig you want to work with and click on the rig card to access its RigPulse page, and locate the Rig rate summarys section.
Create a Rig rate summary: You can create a Rig rate summary by:
Clicking the
Create Rig rate summary button next to the Rig rate summary title.Click the open button to access the previously created Rig rate summarys and click the
Create Rig rate summary button on the top right corner.
Creating a new report
Select date range: On the Create Rig rate summary modal, pick the start and end dates for the report. This defines the report period. Most reports cover a full calendar month, but custom ranges are allowed.
Enter a report title: Add a title to the report. You can edit it after creating the report.
Select wells: All wells with activity in the selected date range are listed. You can deselect any, but at least one must be selected to proceed.
Select contract: If multiple contracts were active during the selected date range, you must choose one. After selecting a contract, the well selection will update to only include those tied to that contract.
Note
A report can only include one contract.
Click Add report: The report is created and opens immediately in edit mode.
Reviewing and editing a report
Once you've created the Rig rate summary, you'll be taken to the detailed report view. Here's how to navigate and edit it step by step:
Edit Operational summaries (if needed): Click into the Operational summary cell for any day to make changes. Edits to summaries must be done before checking the day.
Review Daily drilling reports: If you need more context, click the
 Go Inside button on each line. This opens the Daily drilling report for that day to view full operational details.
Check (lock) the days: Use the checkbox on the right side of the row. Once checked, the day is locked and cannot be edited unless the report is later unlocked (even if the report is still in Draft mode). A tag will show who checked the day.
Important
Each day must be checked (locked) before the report can be sent for approval.
Use the “Set all as checked” button (Optional): If all days look good, you can save time by clicking the Set all as checked button. This locks all days in one go.
Sending the report for approval
Once all days are checked and locked, you can submit the report for approval using one of two methods:
Send for approval in RigPulse
Click Send for approval: On the top right corner of the Rig rate summary, click the Send for approval button to open the options dropdown.
Select Send for approval in RigPulse: Select this option from the dropdown to open a modal and start the approval process in RigPulse.
Select approvers: Check the box next to the required role and select/enter an email address from the dropdown.
Add a comment (Optional): Below the approver selection, you’ll find a text box where you can type any optional comments related to the report before submitting it for approval.
Each approver receives an email notification. Once all have approved, the report’s status changes to Approved status, and it’s locked.
Download the approval document
Click Send for approval: On the top right corner of the Rig rate summary, click the Send for approval button to open the options dropdown.
Select Download approval document: Select this option to generate an approval document and download it in PDF for manual signing.
Notice
Once the document is downloaded, the report status is set as For approval.
Upload the signed document: After signatures are collected, upload the signed document by dragging it into the report or using the Browse files button. Only one document can be uploaded per report. Once uploaded, the report changes to Approved status automatically.
Important
The system does not verify document contents, so ensure the uploaded file is correct.
Updating and unlocking a report
Update changes in the Daily drilling report
If changes are made to the original Daily drilling reports after your report is created, you’ll see a warning banner in the report and on the Rig rate summary dashboard.
Open a report: Rig Pulse alerts you when the Daily drilling report has changes that affect your report. Open the report with the warning banners.
Open the Update based on Daily drilling report modal: Click on the Update based on DDR button on the snack bar at the top of the report to open the update based on DDR modal with all the Daily drilling reports with warnings. Or click directly on a Daily drilling report with a warning sign to open its individual modal.
Understand the Update based on Daily drilling report modal: The modal window shows all the changes that will be applied to the report. Added items appear in green and removed items appear in red with strike‑through formatting.
Click Unlock and update: Apply the updates by clicking the Unlock & update button. The report will return to Draft, and receive a new revision number. It must go through the approval process again.
Unlocking a report
Reports that have been submitted or approved can be unlocked if changes are needed:
Click the lock icon: Navigate to the top right and click the
 lock icon.
Confirm that you want to unlock the report: This cancels the approval and returns it to a Draft state.
Undo unlocking (if needed): If you want to undo unlocking, click the
 dropdown next to the lock icon and select “Cancel Unlocking”; this restores the previous locked state and discards any changes made after unlocking.
Managing revision history
Check the revision history: Click the revision number to open its dropdown or use the
 Open revisions icon on the Right sidebar.
View, expand or export revisions:
Expand or  collapse the revisions for more details and click the
  Export this revision button to export them.
Compare revisions: Use the
 kebab menu to compare revisions.
Examples
A user selects the date range Nov 1 - Nov 30 and adds a title, then, from the auto-suggested options, selects the contracts and wells for that period. After reviewing and locking each day, the report is sent for internal approval. If DDRs change after submission, the user is prompted to update and re-submit for approval.
Tips and tricks
Use the Set all as checked option to quickly lock all days before approval.
If the date range overlaps multiple contracts, remember only one can be used per report.
You can always unlock and revert a report, even after approval. Just be aware that doing so resets the approval process.
Troubleshooting
Manual approval risks: Uploaded documents aren’t system-validated. Ensure the correct, signed document is uploaded. Only one can be attached.
Syncing issues: If data from Daily drilling reports changes after days are locked, RigPulse won’t auto-update. Users must manually trigger the update process.
Locked day: Even if a report is in draft, checking a day locks it. Be cautious with premature checks to avoid having to unlock and reprocess reports.